Montag, 31. Dezember 2012

New Year - New Project! Neues Jahr, neues Projekt!

Today is the last day of the first full aircooled season for me and my Volksback. It was a great pleasure to visit several VW Shows and meeting you and all the other petrolheads. The new Year will start with a new project, but the first pictures will have to wait a little longer, stay tuned for another aircooled highlight highride!
I like to wish all my Blog readers a happy new Year 2013 and - besides lots of fun and success - good health, as this is the most important thing to have!

Heute ist der letzte Tag meiner ersten vollständigen Saison mit dem Volksback. Es hat grossen Spaß gemacht diverse Treffen zu besuchen und viele von Euch "Benzinköppen" zu treffen. Das neue Jahr wird mit einem neuen Projekt starten, aber die ersten Bilder lassen noch ein wenig auf sich warten, bleibt dem Blog treu für ein weiteres luftgekühltes Highlight! Nur schon mal soviel: Es wird ein echter "Flitzer"...
Allen Bloglesern von hier aus schon mal einen guten Rutsch ins Jahr 2013 und neben viel Spaß und Erfolg vor allem Gesundheit, denn das ist tatsächlich das Wichtigste! 

Montag, 24. Dezember 2012

... some new Hot Wheels ...ein paar neue Hot Wheels

...usually I buy my Hot Wheels and keep them mint and sealed in the blistered card, but from time to time I just have to "release" one from their package  - or two - or three ...
Normalerweise werden die Hot Wheels die ich kaufe direkt in meine Sammlung einsortiert, mit möglichst einwandfreier Karte usw, aber manchmal muß ich einfach einen auspacken - oder 2 - oder 3... 

Here are my latest entries, a brand new casting for 2013, the "Volkswagen Kool Kombi", a 2012 Custom Volkswagen Beetle in purple and a 2013 55' Chevy Bel Air Gasser:
Hier ein paar meiner neusten Errungenschaften: der 2013'er VW "Kool Kombi"- aus einer ganz neuen Form, ein 2012'er Custom VW Beetle in lila und ein 2013'er Chevy Bel Air Gasser:  


those will be "unwrapped" soon...  ... die pack' ich mal aus!

Sonntag, 23. Dezember 2012

IRS bracket preparation... Schräglenkeraufnahmen präparieren

Yesterday I finally had some time to take care of the IRS brackets which were just hacked out of an old beetle pan:
Gestern konnte ich mich endlich mal um die Schräglenkeraufnahmen kümmern, die ja nur "sehr grob" aus einer alten Käfer-Bodengruppe herausgetrennt waren:


... a few of hours of grinding later: ... nach einigen Stunden mit der Flex:
A lot of scrap metal and the important bits...  Ein ganzer Haufen Schrott und die 2 wichtigen Teile...

I ended up with 2 nice brackets to be welded onto a subframe soon:
Das Endprodukt: 2 feine Schräglenkeraufnahmen, die möglichst bald an einen Fahrschemel geschweißt werden:

... at the end I found out that these brackets are exactly the same bits which were used on a Type 3 IRS subframe!
... letztlich habe ich noch festgestellt das die Aufnahmen exakt die gleichen sind, die am original Typ 3 Schräglenkerfahrschemel angeschweißt wurden!

Sonntag, 2. Dezember 2012

Sonntag, 25. November 2012

no parking light? ...kein Standlicht?

another small job, one parking light didn't work since I installed the (brand new) H4 head lights...
Easy job - replace a bulb - ready! ... or not!  I replaced the bulb - still no light!
Upon closer inspection with the ohmmeter, there was a fault in the base socket -the connection from the spade to the bulb was missing!
So, another job for Dr. Emel, the soldering iron and some sealant to fix that.

Eine weitere kleine Reparatur war fällig. Ein Standlicht war ohne Funktion - seitdem ich die (nagelneuen H4) Scheinwerfer montiert hatte. Kein Problem, neues Birnchen 'rein und fettich! - oder nicht...
Beim Messen mit dem Ohmmeter bestätigte sich, das der Sockel keinen Durchgang vom Steckverbinder zum Lampenkontakt hatte.
Also, 'raus mit Dr. Emel, dem Lötkolben und ein bisschen Vergußmaterial... 

brand new - but out of order!  Nagelneu, aber defekt!

So, removing the potting material with the Dremel ...    Also, alte Vergußmasse wegdremeln ...

... soldering the spade to the contact ...     ... Kontaktzunge anlöten ...

... and some sealant to make the connection water tight!   ... und noch etwas Vergußmasse um Alles wasserdicht zu machen:
   ... another job done!      ... ein weiterer Job ist erledigt!

some cosmetics... kosmetische Reparaturen

As the Volksback is on jack stands anyway, I took some time to fix a few things which bugged me since day one, both the front fenders were kinked slightly in the lower front area after assembly, but a heat gun, a rubber hammer and a little persuasion "ironed" them out!

Da der Volksback sowieso zur Zeit auf Böcken ruht habe ich heute mal ein paar Dinge repariert die mich von Anfang an gestört haben: Beide vorderen Kotflügel hatten nach der Montage einen Knick im unteren, vorderen Bereich. Mit Heißluftpistole und einem Gummihammer habe ich diese Knicke "ausgebügelt":
right fender before:
... and after:

left fender before:


Also, one of the tie rods was assembled the wrong way around. So, I pulled the fuel tank and flipped the rod:
Ausserdem war ja eine Spurstange verkehrt herum eingebaut, also Tank ausgebaut und die Stange umdreht:

before:
The jam nut end is on the pitman arm - which is wrong!
Hier ist noch die Kontermutter am Lenkhebel - falsch!

after:
The clamp end is on the pitman arm. good again!
Jetzt ist die Klemmschelle am Lenkhebel - richtig!

Samstag, 24. November 2012

precious metal / Edelschrott

I finally purchased a set of original  IRS brackets, cut away from an old beetle chassis, to modify the subframe. Now in rough shape, but this will change soon!


Endlich konnte ich einen Satz Schräglenkeraufnahmen aus einem Spenderchassis ergattern, die sehen zwar noch recht gebraucht aus, aber das wird sich noch ändern!

Sonntag, 18. November 2012

TIG-welded fan / WIG-geschweisstes Lüfterad

the next engine will be able of much higher rev's, so a friend TIG welded the blades to the fan to avoid self-destruction of the fan - and the engine. Later it will be balanced before it will be mounted.
Also the surface rust will be removed and it will be zinc coated/passivated. Even if the risk is not as high as on the type 1 engine, as the the fan on a Type 3 is crankshaft mounted,  I ll be better save than sorry!


Der neue Motor wird höhere Drehzahlen erreichen als der Standardmotor. Um zu vermeiden das sich das Lüfterrad bei höheren Drehzahlen selbst zerstört - und anschließend den Motor - hat ein Kollege die einzelnen Schaufeln WIG-geschweisst. Es wird noch feingewuchtet bevor es irgendwann eingebaut wird. Natürlich wird der Oberflächenrost noch entfernt und das Ganze anschliessend verzinkt / chromatiert! Das Problem ist am Typ 1 Motor zwar noch grösser, da das Lüfterrad sich schneller dreht als die Kurbelwelle und die Schaufeln da dann auch gerne in die Zylinder "einschlagen", aber ich gehe lieber auf Nummer sicher!

Sonntag, 4. November 2012

Big brake installation, part I / Bremseneinbau Teil I

I was asked by several people to go back to German AND English text - so here you are! - I would like to get some comments about that, please!
Ich wurde inzwischen mehrfach gebeten wieder in Deutsch und Englisch zu posten - Bitte sehr! - Über einen Kommentar dazu würde ich mich freuen.

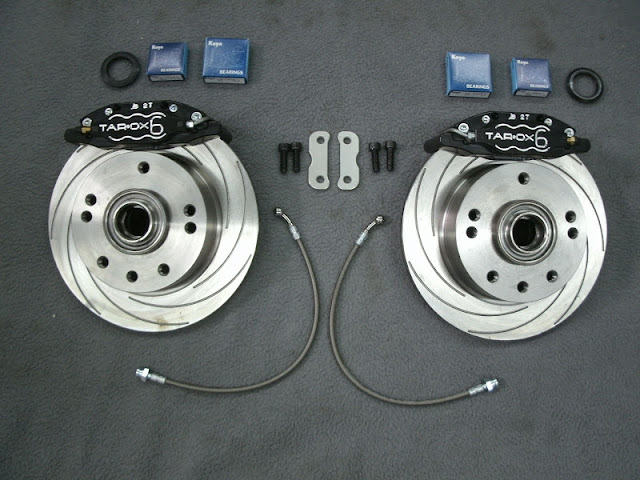
Today I started the installation of my front brake update kit:
Heute habe ich angefangen die neue Bremse zu installieren:
grooved and vented discs, calipers, adaptor plates, braided brake lines, new inner and outer bearings and seals (note the 4x130 + 5x130 PCD on the discs!)
Innenbelüftete, geschlitzte Bremsscheiben, Bremssättel, Adapter, Stahlflex Bremsleitungen, neue Lager für Innen und Außen sowie neue Dichtringe (Man beachte die 4x130 + 5x130 Lochkreisbohrungen in den Scheiben!)

Step 1: lift the car up and put it on jack stands, safety first!
Schritt 1: Fahrzeug anheben und sicheren Stand auf Böcken gewährleisten - Safety first!

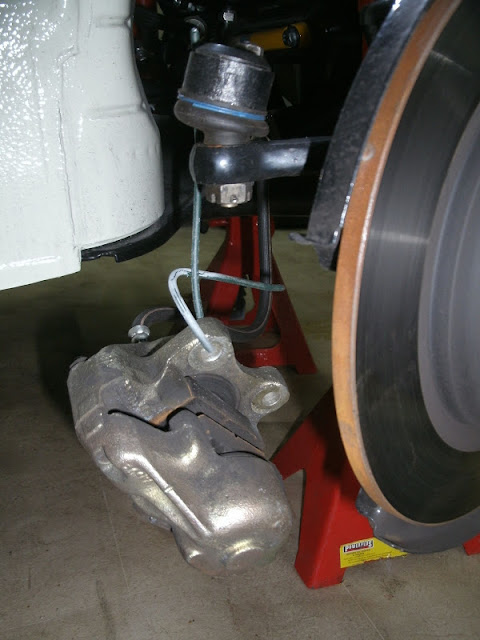
Step 2: Remove wheels and the original caliper, but leave the brake line connected, use some wire to secure the caliper 
Schritt 2: Räder und Original Bremszange entfernen (Bremsleitung erstmal angeschlossen lassen!) und die Zange mit einem Draht sicher befestigen

Step 3: Remove outer bearing and the original disc, use some brake cleaner for a quick clean
Schritt 3: Äusseres Lager und Bremsscheibe entfernen, Bremsenreiniger hilft beim Reinigen
Step 4: Remove the backing plate and put the old disc back on for a first mock-up with the new caliper.
Schritt 4: Bremsstaubblech entfernen und die alte Bremscheibe für eine erste Anprobe wieder montieren 

My biggest concern was that the "fat" caliper might interfere with the wheel, but there is plenty of space - even more than on the original part:
Meine größte Sorge war, das die "fette" Bremszange nicht genug "Luft" zur Felge haben würde - Diese Sorge war unbegründet - es ist sogar mehr Platz als bei der Original-Zange:


 ... plenty of space
... reichlich Luft

I tried to modify the backing plate and keep it installed, but in the end I found out it is impossible to use...
I made a card board template and cut the backing plate:
Ich habe versucht das Bremsstaubblech zu modifizieren um es wieder montieren zu können,  schliesslich musste ich feststellen das dieses Blech nicht mehr passt - Ich habe zuerst eine Schablone gemacht um die Kontur der neuen Zange auszuschneiden:

I used the good old Dr. Emel for this job, I also bent the ends up for additional stiffness
Ich habe den guten alten Dr. Emel dafür benutzt, und die Enden umgebogen um mehr Stabilität zu erreichen
 ... just to find out later that there is no use for the backing plate, as the vented disc is too thick...
... um schlußendlich festzustellen das die innenblüftete Scheibe zu dick ist und kein Platz bleibt!

Step 5: Put the bearings in the freezer for some time, then use a torch to carefully and evenly warm up the bearing areas on the discs, then insert the outer bearing rings...
Schritt 5: Die äusseren Lagerringe für ein paar Stunden in den Tiefkühler legen und anschliessend die Lagersitze der Scheibe vorsichtig und gleichmäßig mit der Flamme erwärmen, Lagerringe einpressen...

... more to come ...
... Fortsetzung folgt ...

Mittwoch, 31. Oktober 2012

Happy 1st Birthday, Volksback!


Today, exactly 1 year ago, the Volksback hit the streets after a successful TÜV approval. I used it as often as possible and enjoyed every single minute. We visited a lot of big and small VW meetings and everything went perfect, more than 5.000 km without any issues - which proves that we did a not to bad job...
We? Yes, without the help of Ralf ( http://www.rallegolle.blogspot.de/)I am sure the Volksback would still be just a stack of old rusty bits...
Thank you Ralf for all your support - and your motor - otherwise the Volksback could only park in the garage...!

Sonntag, 28. Oktober 2012

some updates...

the Radio Flyer project got a little progress, the cart tyres are finally mounted on the rims:
complete with new valves. The guys from Daytona Indoor cart in Essen http://www.daytonakartbahn.de/Home.aspx were super nice and helped me out with their equipment and knowledge- Thanks for that!
...  this is how the rims looked before:

For my new motor I bought another set of cylinder heads - 044 series, already machined for 92/94mm pistons:
and I found another engine case, with 8mm studs instead of 10mm studs - which allows ~ 2,1 liter displacement :-)

The Volksback itself is now equipped with the classic style Radio - and some good working speakers:
The chrome style fits really well with all the other chrome levers in the dashboard! Even the integrated Bluetooth hands free function works perfect! ( unless the motor gets too loud...)

I used some MDF board and mounted 2 speakers in the original speaker position:


The Emphaser ECX80 S4 speakers have big magnets for their overall size - it is still no High Fidelity, but it works o.k. for me and I didn't had to butcher up any visible Interior to make them fit!


Samstag, 13. Oktober 2012

black is (even more) beautyful...

The folks from DeiKäferService in Italy were so nice and exchanged my red calipers for black ones! Now the new brake system is more stealth and not so -in your face- like a red one would have been.
I hope to be able to mount this stuff soon...

Sonntag, 7. Oktober 2012

Käfertreffen Dorsten 07 Oktober 2012

Today we visited the seasons last meeting, Dorsten. It was packed as always, the space is limited there. The weather was perfect - as always in Dorsten. Here are a few shots:


the perfect licence plate:


I also met Holger, the Empidoc: http://empistyler.blogspot.de/, today, he had a real cool gift for me, a Auto Motor und Sport automotive magazine from 1968 with a comparison of 2 VW 1600tl, carburated vs. fuel injected!

Thank you, Holger!