Today I finally received a set of some of the most precious and seldom parts of the VW type 3: The aluminum / cardboard composite heater tubes with 28 mm inner diameter- new old stock!
now I can finally set up the correct heating system as in January 1966 when the Volksback was initially assembled! Special Thanks to Thorsten E. for this literally "hot" tip!
Jetzt kann das Heizungssystem endlich originalgetreu wie einst im Januar 1966 wieder zusammengebaut werden! Vielen Dank an Thorsten E. für diesen "heißen" Tipp!
Donnerstag, 20. Oktober 2011
Sonntag, 16. Oktober 2011
look mum, no gears...
I recently discovered that it is impossible to shift into reverse and the position of the shifter appeared odd.
Irgendwie war der Rückwärtsgang nicht zu finden und der Schalthebel hat komisch gesessen.
After some research I found out that the counter sunk on a type 3 "hockey stick" is different from the type 1. As I used a type 1 tranny, the shift rod coupler was positioned in a wrong location, making it impossible to find all gears.
Nach kurzer Recherche war klar das das Typ 3 Getriebe einen anderen "Hockey stick" hat als die Typ 1 Getriebe - die Senkung zur Positionierung der Schaltstange liegt in einem anderen Winkel!
What to do now? Pull the motor, pull the tranny, dismantle the tranny, exchange the hockey stick and put everything together? NO WAY!!!
Und jetzt? Motor 'raus, Getriebe 'raus, Getriebe teilzerlegen und alles wieder zusammenbauen? - Bitte nicht!
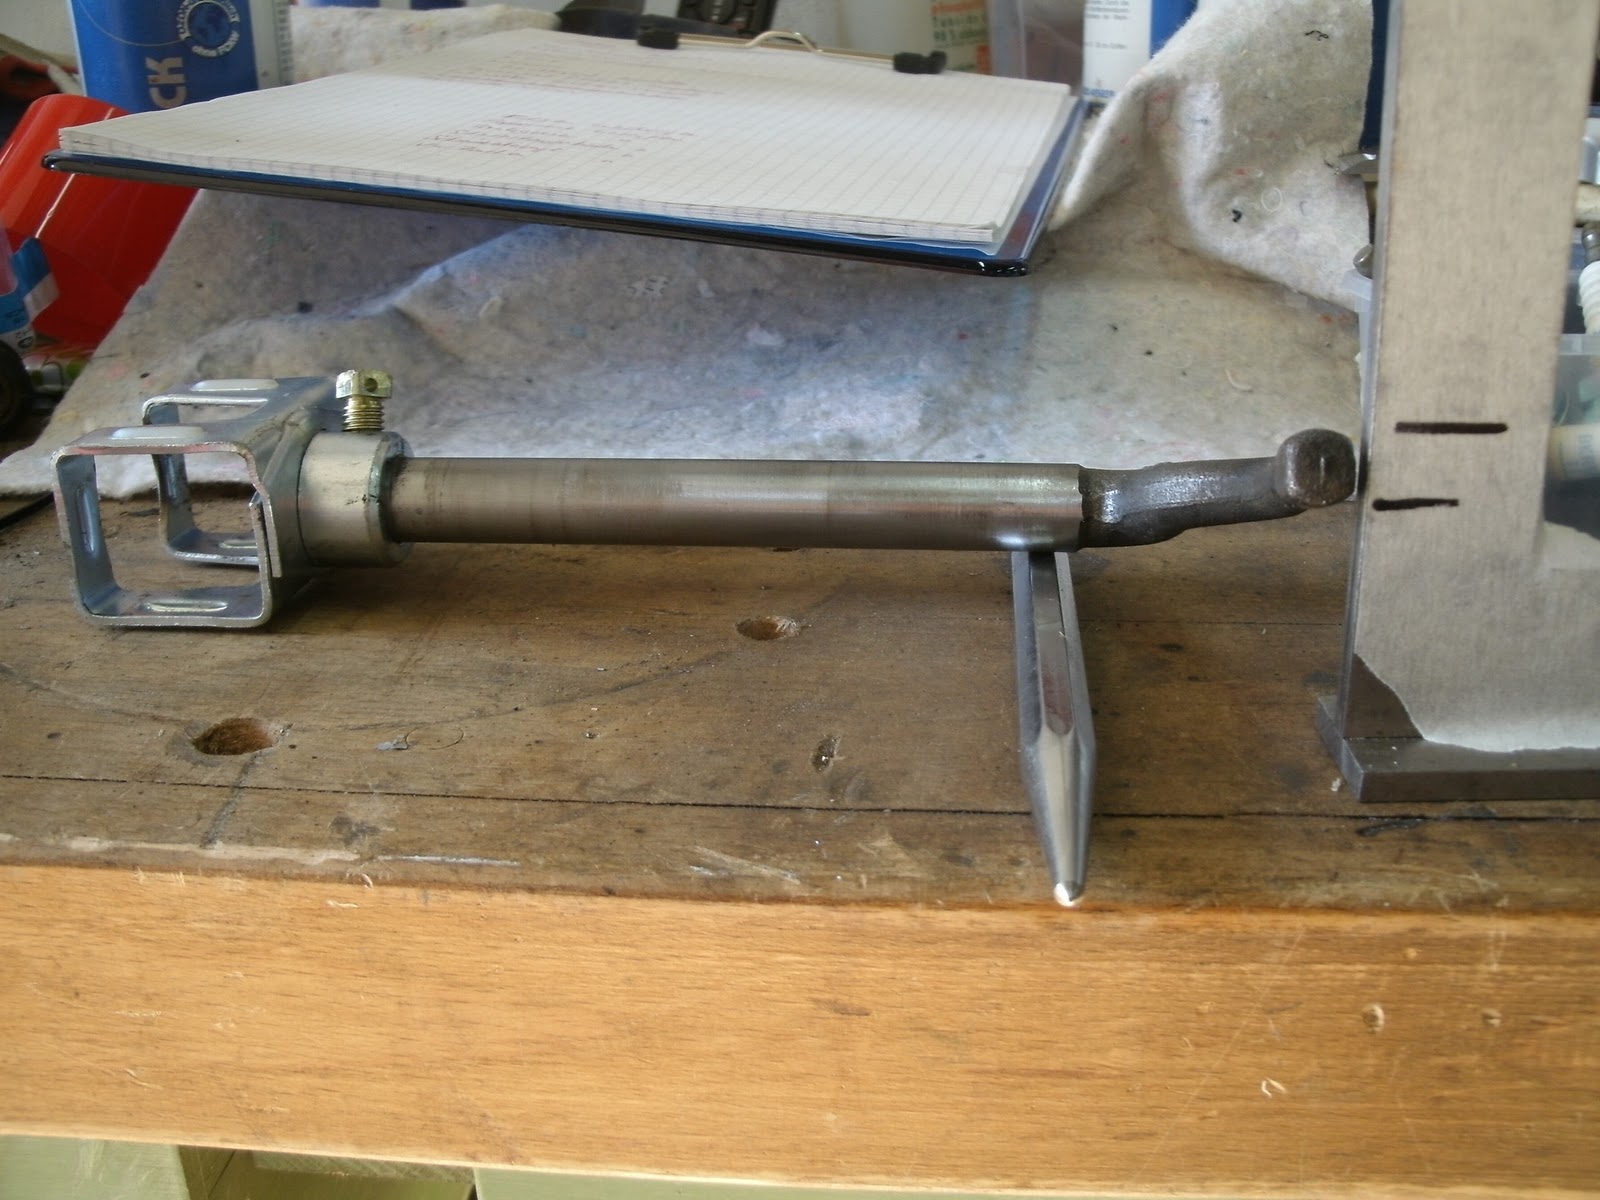
So I set up a "gauge" with the position of the og type 3 hockey stick's position in relation to the og VW shift rod coupler. Then I used a type 1 hockey stick and an aftermarket shift rod coupler, set it up in the same position with the gauge as a guide and re-drilled and tapped a new thread in the coupler. Now, all gears are present! The aftermarket shift rod coupler has an evenly thick diameter to drill and tap a thread, the og coupler has only 1 position for a threaded hole- no chance to drill + tap elsewhere...
Also habe ich mir eine kleine "Lehre" gebaut mit der VW Schaltstangenkupplung und einem original Typ 3 "Hockey stick". Dann habe ich eine Zubehör Schaltstangenkupplung und einen Typ 1 Hockey stick so ausgerichtet wie die Originalteile und eine neue Gewindebohrung für die Madenschraube gesetzt.
The Original: VW shift rod coupler and type 3 hockey stick
Das Original: VW Schaltstangenkupplung mit Typ3 "Hockey stick"
aftermarket coupler with type 1 hockey stick set-up to the new position
Zubehör Schaltstangenkupplung mit Typ1 Hockey stick auf die neue Position ausgerichtet
here you can guess the dis-alignment between the 2 positions: black paint mark on the shift rod coupler is opposite to the original thread- perpendicular to the shift rod.
Paint mark on the hocker stick is the location of the counter sunk, punch mark shows required new hole.
Hier ist der Versatz zwischen der alten und neuen Position erkennbar. Die Markierung auf der Kupplung liegt exakt gegenüber der Original Gewindebohrung - rechtwinklig zur Schaltstange, Der Körnerpunkt markiert die neue Bohrung.
here you can see the new thread (left, with set screw) and the old one.
Hier links die neue Bohrung (Mit Madenschraube) und rechts das alte Gewinde (senkrecht zur Schaltstange ausgerichtet)
final check: The new set up is exactly where it is supposed to be - spot on!
Hier zur Kontrolle nach dem Bohren und Gewindeschneiden - passt genau!
It is clearly visible that the new set screw position is off center - no wonder the standard, center position didn't work! All done in roughly 1 hour without dismantling half the car!
Man kann genau erkennen das die Madenschraube jetzt in einem Winkel auf die Schaltstange trifft und nicht mehr senkrecht - Jetzt sind auch alle Gänge schaltbar. Und das alles in gut 1 Stunde, ohne das halbe Auto zu zerlegen...
Irgendwie war der Rückwärtsgang nicht zu finden und der Schalthebel hat komisch gesessen.
After some research I found out that the counter sunk on a type 3 "hockey stick" is different from the type 1. As I used a type 1 tranny, the shift rod coupler was positioned in a wrong location, making it impossible to find all gears.
Nach kurzer Recherche war klar das das Typ 3 Getriebe einen anderen "Hockey stick" hat als die Typ 1 Getriebe - die Senkung zur Positionierung der Schaltstange liegt in einem anderen Winkel!
What to do now? Pull the motor, pull the tranny, dismantle the tranny, exchange the hockey stick and put everything together? NO WAY!!!
Und jetzt? Motor 'raus, Getriebe 'raus, Getriebe teilzerlegen und alles wieder zusammenbauen? - Bitte nicht!
So I set up a "gauge" with the position of the og type 3 hockey stick's position in relation to the og VW shift rod coupler. Then I used a type 1 hockey stick and an aftermarket shift rod coupler, set it up in the same position with the gauge as a guide and re-drilled and tapped a new thread in the coupler. Now, all gears are present! The aftermarket shift rod coupler has an evenly thick diameter to drill and tap a thread, the og coupler has only 1 position for a threaded hole- no chance to drill + tap elsewhere...
Also habe ich mir eine kleine "Lehre" gebaut mit der VW Schaltstangenkupplung und einem original Typ 3 "Hockey stick". Dann habe ich eine Zubehör Schaltstangenkupplung und einen Typ 1 Hockey stick so ausgerichtet wie die Originalteile und eine neue Gewindebohrung für die Madenschraube gesetzt.
The Original: VW shift rod coupler and type 3 hockey stick
Das Original: VW Schaltstangenkupplung mit Typ3 "Hockey stick"
aftermarket coupler with type 1 hockey stick set-up to the new position
Zubehör Schaltstangenkupplung mit Typ1 Hockey stick auf die neue Position ausgerichtet
here you can guess the dis-alignment between the 2 positions: black paint mark on the shift rod coupler is opposite to the original thread- perpendicular to the shift rod.
Paint mark on the hocker stick is the location of the counter sunk, punch mark shows required new hole.
Hier ist der Versatz zwischen der alten und neuen Position erkennbar. Die Markierung auf der Kupplung liegt exakt gegenüber der Original Gewindebohrung - rechtwinklig zur Schaltstange, Der Körnerpunkt markiert die neue Bohrung.
here you can see the new thread (left, with set screw) and the old one.
Hier links die neue Bohrung (Mit Madenschraube) und rechts das alte Gewinde (senkrecht zur Schaltstange ausgerichtet)
final check: The new set up is exactly where it is supposed to be - spot on!
Hier zur Kontrolle nach dem Bohren und Gewindeschneiden - passt genau!
It is clearly visible that the new set screw position is off center - no wonder the standard, center position didn't work! All done in roughly 1 hour without dismantling half the car!
Man kann genau erkennen das die Madenschraube jetzt in einem Winkel auf die Schaltstange trifft und nicht mehr senkrecht - Jetzt sind auch alle Gänge schaltbar. Und das alles in gut 1 Stunde, ohne das halbe Auto zu zerlegen...
Donnerstag, 13. Oktober 2011
again... more assembly pics... mehr Bilder...
the kick panels are installed, as well as the refurbished steering wheel. I added an additional fuse box for all kinds of electrical gadgets which will follow later...
Die Trittbleche sind 'drin, genau wie das überarbeitete Lenkrad. Ein zusätzlicher Sicherungskasten für alle möglichen Spielereien die noch folgen werden ist auch eingebaut ...
driver's kick panel, powder coated... Trittblech Fahrerseite - pulverbeschichtet
passenger kick panel (of course also powder coated, like the rest of the pan, too)
Beifahrer-Trittblech, natürlich auch pulverbeschichtet - genau wie der Rest der Bodengruppe)
the repaired and repainted steering wheel... Das ausgebesserte und neu lackierte Lenkrad
the fuse box - hidden from the usual sight but still accessible
Der Sicherungskasten, normalerweise nicht sichtbar, aber immer noch gut zugänglich...
as winter is slowly comming along, the heater duct bellows are also set up
Der Winter kommt, also sind die Heizungsluftverteiler auch schon eingesetzt:
Die Trittbleche sind 'drin, genau wie das überarbeitete Lenkrad. Ein zusätzlicher Sicherungskasten für alle möglichen Spielereien die noch folgen werden ist auch eingebaut ...
driver's kick panel, powder coated... Trittblech Fahrerseite - pulverbeschichtet
passenger kick panel (of course also powder coated, like the rest of the pan, too)
Beifahrer-Trittblech, natürlich auch pulverbeschichtet - genau wie der Rest der Bodengruppe)
the repaired and repainted steering wheel... Das ausgebesserte und neu lackierte Lenkrad
the fuse box - hidden from the usual sight but still accessible
Der Sicherungskasten, normalerweise nicht sichtbar, aber immer noch gut zugänglich...
as winter is slowly comming along, the heater duct bellows are also set up
Der Winter kommt, also sind die Heizungsluftverteiler auch schon eingesetzt:
bench mark
The upper area of the rear seat frame had some rust from years of water ingressing through the old worn rear window seal. I visited Jens once more for a little blasting session - Thank's again, Jens!
Das Gestell der Rücksitzlehne war ordentlich verrostet, da jahrelang Wasser durch die Heckscheibendichtung, unter die Hutablage und in die Bank gesickert war. Nach einem Blitzbesuch beim lieben Jens Kraft war alles wieder fit! Hier der gestrahlte Bereich, schon mit Zinkchromat behandelt.
Samstag, 8. Oktober 2011
assembly pics - what else? Bilder vom Zusammenbau - wie immer...
The trunk is ready! The brake is bled and working as well as the motor.
Der Kofferraum ist jetzt auch fertig. Der Tank ist montiert und angeschlossen, genauso wie der Bremsflüssigkeitsbehälter. Die Bremse ist entlüftet.
Here are some pics:
more zinc plated hardware...
the brake fluid reservoir - ready to go!
the trunk: fuel tank and spare wheel carrier mounted!
Der Kofferraum ist jetzt auch fertig. Der Tank ist montiert und angeschlossen, genauso wie der Bremsflüssigkeitsbehälter. Die Bremse ist entlüftet.
Here are some pics:
more zinc plated hardware...
the brake fluid reservoir - ready to go!
the trunk: fuel tank and spare wheel carrier mounted!
Sonntag, 2. Oktober 2011
interieur: It's comming together... Innenausstattung: langsam wird's
This is the latest pic from the inside of my fasty: Sun visors and rear view mirror in place! -looks too nice with the new headliner!
Das neueste Bild vom TL: Sonnenblenden und Innenspiegel sind montiert! Echt fein, zusammen mit dem neuen Innenhimmel!
new baby's! ... neue Baby's... or: 2 liter please!
finally my "new" set of used VW Porsche Babyfuchs wheels is complete - next week they go to a wheel doctor for "intesive care"! Endlich ist der "neue" Satz gebrauchter VW-Porsche Original Babyfuchsfelgen komplett, nächste Woche gehen die erst mal zum Felgendoktor in die Intesivstation!
A set of repop center caps is already ordered... Ein Satz Repro-Nabenkappen ist auch schon bestellt!
Abonnieren
Posts (Atom)