Freitag, 29. April 2011

multi gauge puzzle / ... Armaturenpuzzle part II

Today I finished the gauges, I found a better paint for the bezels (with less gold) - now the color of the bezels comes very close to the center caps (sorry - not so easy to catch with my crappy digicam and in this light). I polished the "glasses" which are made of plastic - here is the fuel gauge:


Heute habe ich die Armaturen fertig gemacht, ich habe eine bessere Farbe für die Zierringe gefunden (etwas weniger golden) - Die Ringe kommen den Abdeckungen in der Mitte jetzt schon recht nah (auf den Bildern nicht so gut zu erkennen)  Die Chromringe und Plexischeiben sind poliert:

 (there is a light reflex in the upper area, the glass looks crystal clear in real life) the chrome ring is exactly the same as on the "before" picture in the last post!
(Im oberen Bereich ist eine Reflexion auf dem Foto - Die Scheibe ist makellos) Der Chromring ist der gleiche wie in meinem letzten Post auf dem "davor" Bild!


I also updated the 12V clock:    Die 12V Uhr habe ich auch überholt
chrome ring and "glass" are polished as well, the needles are repainted in white.
Chromring und Plexischeibe poliert, Ring lackiert, die Zeiger sind auch neu lackiert.


Here is a direct comparison of the 2 different colors I used for the bezels: 12V clock on the left ( more silver-ish) 6V clock on the right (more golden)
Hier nochmal der Vergleich der beiden Farben die ich zum Lackieren der Ringe benutzt habe: links die 12V Uhr - etwas mehr silbern und rechts die 6V Uhr - etwas mehr golden:
 close up - makes it a little more obvious:

 12V   vs.   6V


After reassembly I noticed that the clock didn't work, so I removed the rear cap:
Nach dem Zusammenbau musste ich feststellen das die Uhr gar nicht läuft! - Also: Abdeckung abmachen:
after some investigation on the net (thanks to http://www.thesamba.com/vw/) I knew where I had to look for:
Nach einer Recherche auf thesamba.com wusste ich wonach ich suchen musste:

There had been a thermo fuse (basically a glob of low temperature solder) which "corrodes away" during the years
In der Markierung sollte sich eine "Thermo-Sicherung" (ein Lötpunkt Niedrigtemperaturlot) befunden, der über die Jahre aber ganz gerne "ab-korrodiert"


I re-soldered this (with standard solder) and now it works perfect! If it should run too fast or too slow I can re-adjust the "speed" with this dial:
Ich habe die Stelle neu gelötet ( mit normalem Lot) und die Uhr läuft wieder 1A. Sollte die Geschwindigkeit nicht stimmen, kann man an diesem Rädchen etwas feinkalibrieren:
 Job done - see you all in Hannover for the DFL Cruise Night and the MKT (MaiKäferTreffen)

Mittwoch, 27. April 2011

multi gauge puzzle / ... Armaturenpuzzle

Here is a swap meet find from Rosmalen, a fuel gauge with the rare symbols:
parking light (bottom left) and oil pressure (bottom right)  

hier ist ein "Schnapper" aus Rosmalen - eine Tankanzeige mit den seltenen Symbolen für Parklicht und Öldruck
for 5 €uro it was quite a bargain - but in very bad shape...
So, I dismantled it and swapped the dials into a later 1970 12V unit...

Für 5 €uro ein Schnäppchen aber in einem miesen Zustand, also habe ich das Teil zerlegt und die Symbole in ein 1970er 12V Gehäuse eingesetzt:

 before...

  after...

tomorrow I will polish the glass and reassemble everything. Morgen wird die Scheibe poliert und alles wieder zusammengesetzt...

When I checked my already refurbished 1966 model year unit, I discovered that the center cap from the 1967 and the 1970 models are the same, but on the 1966 part the center cap had no dimple, just a flat surface:
Beim Vergleich mit dem 1966 Modell fiel mir auf das die Abdeckung in der Mitte unterschiedlich ist, beim 67er und 70er gibt es in der Mitte einen "Dom", das 66er Modell ist einfach glatt in der Mitte:
... also note that there are no symbols but ribbed caps on all the control lights! ... man beachte auch die fehlenden Symbole und gerippten Gläser für die Kontrollleuchten!

new starter / ... neuer Anlasser

Today I received my new starter. Although it was advertised for VW Beetle and Transporter, it didn't fit! The pilot diameter and the hole distance were wrong! Too bad, as it was redicously cheap @ under 50 €uros! Luckily I got some info which other starter might work, too... more later!
Heute ist mein neuer Anlasser angekommen - leider passt er nicht, obwohl er u.a. für Käfer und Transporter (...aber auch für Skoda Octavia etc.) angeboten wurde... Weder der Zentrierdurchmesser noch der Lochabstand waren korrekt.  Zu blöd, denn das Ding kostete unter 50 €uro! - Ich habe aber noch einen heißen Tipp bekommen - bei Gelegenheit mehr dazu...

Dienstag, 26. April 2011

success! TÜV approval!

look:


... but only for my bike ;-)

... the ugly plastic piece on the tail is only to please the TÜV expert - it went off 1 minute after this picture was taken!

... as always I stopped by at the workshop I trust in for more then 20 years now, when it comes to things I don't want to do or I can't do as well as when it comes to wheels and tyres:
http://www.sks-muelheim.de/
I also purchased a little more transmission oil there to completely fill up the gearbox:


... and on the chassis I finally got the body seal completed:

...now I am waiting for the body!

Montag, 25. April 2011

the cable guy... / a rolling chassis...

Today I wanted to clean up the mess in my garage - when I came across the old wiring harness which had to be re-done... Heute wollte ich eigentlich die Garage aufräumen, da fiel mir der alte, brüchige Kabelbaum in die Hände...
A few hours later my driveway looked like this... etwas später sah meine Einfahrt so aus:
but this afternoon my new main harness was ready! ...aber heute Nachmittag war der Hauptkabelbaum fertig!
the next thing I have to care about is the front loom ... was what I was thinking when my buddy Ralf stopped by and he helped me connecting the front to the rear - a rolling chassis!  ( minus the front wheels) - thanks again for the helping hands!
Als nächstes ist der vordere Kabelbaum dran dachte ich als... gerade mein Buddy Ralf vorbeischneite - genau richtig um mir bei der Montage des Fahrschemels an das Chassis zu helfen - Jetzt ist es ein "rolling Chassis" - Nochmal Danke von hier aus!

 the garage REALLY has to be cleaned up by now... jetzt muß ich aber WIRKLICH mal aufräumen...
clutch cable connected... Kupplungsseil eingebaut...
brake lines connected, e-brake cables connected... quite something done today...
Bremsleitungen und Handbremsseile montiert ... ganz schön was geschafft heute!

... mal was in eigener Sache...

Legt jemand noch Wert auf die Deutschen Texte? - Bitte einen Kommentar abgeben!
Gruß,
Markus

Sonntag, 24. April 2011

build myself a nice Wheelbarrow!


 rear axle completed! Spend a busy afternoon in the garage, completely assembled the axle shafts, with all new spares, reassembled the rear brakes, mounted the tranny with new rubber mounts onto the rear end...
 filled in gear box oil and checked for possible leaks - luckily it seemed to be an oil tight installation...
 re-used the axle boots I just installed on the 6V rear axle - these parts were new and have never seen daylight.

Installed the rear KONI dampers etc.

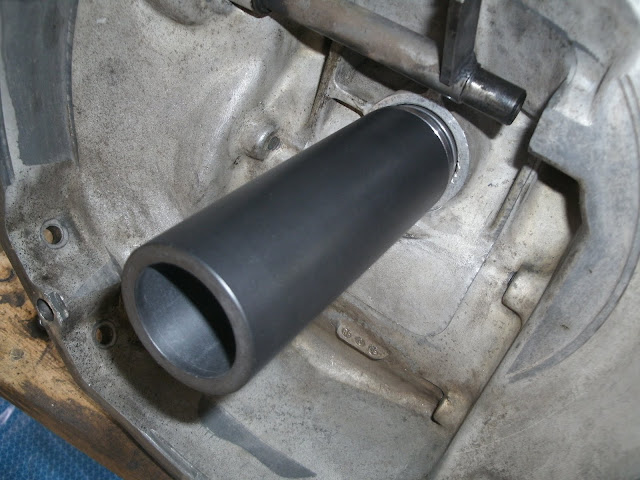
Here are some close-ups of the throw-out bearing guide I also installed today:
 input shaft seal removed...

 here is the new sleeve, made by Beetle Factory in Wuppertal ( I know it can also be purchased through some other companies) - but how to install it correct without mis-alignment???
 here is a special made bushing that a friend of mine machined, to give the new sleeve a good guidance during installation
 another bushing, this time to make sure the installation with a hammer will not harm the sleeve and to carefully spread the mounting forces ( both bushings are made of a special plastic material)
 inner bushing, guiding sleeve, outer bushing
 I applied a little locktite extra strong  on the knurled area before I carefully hammered the sleeve into the housing
- done! - with the 2 bushings it was an easy task, without them - it would have been impossible to really align the sleeve properly!
 throw-out bearing installed
Now I finally got a narrow swing axle with the internals of a A0 drivetrain and a guided throw-out bearing !
Only awaiting the motor... (and a new starter)

spare parts from VW arrived, now time for completing the gearbox

After a week of vacation on the (not always so) sunny Island of Mallorca, I am happy to found some spares in the mail.
 2 brand new shims for the installation of the driveshafts. They were available in different thicknesses, after some careful measurement it turned out that I needed some quite thick ones (4.2mm) which were only available from VW Classic Parts Center.
Now I can proceed with the completing of the gear box and maybe we will see a rolling chassis anytime soon...
I'm heading into the garage now!

Mittwoch, 13. April 2011

some good news from the paint shop + new headliner!

today I visited the paint shop: the body and most of the other parts are already in filler. I will (most probably) get the body back until end of this month! The doors and hoods will follow later, which suits me just fine. So I can put the new wiring harness etc in, before the other parts arrive!


I also received my new headliner today.

Looks great, original material! I can only suggest to buy your next headliner here: http://www.himmelservice.de/

Dienstag, 12. April 2011

new gearbox and a little progress...

After the last drawbacks it was hard to motivate myself, but finally I got something done:

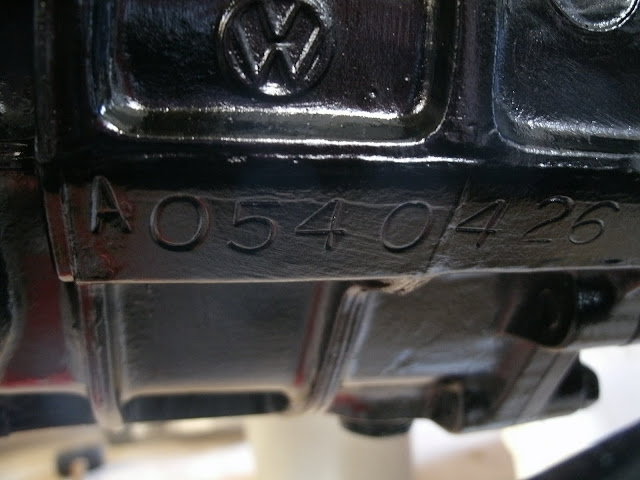
 a "A0" Gearbox! - the secret to mileage - or speed ;-)  - I spent a complete day with cleaning / degreasing the housing and gave it a "rattle can" paint job in gloss black. Thank you Magnus for finding this gearbox!

There are some parts which have to be updated / changed and modified. I will mount a special adaptor from company "Beetle factory" to change from "non-guided" to "guided" throw-out bearing!
The starter bushing and fulcrum plates will be exchanged for new parts as well as the plastic-"daysies"

 Currently I am changing the axle tubes from "wide" to narrow", as I want to hide the 5,5" rims under the rear wheel wells without any modifications.

The body/chassis seal found its way onto the chassis, glued on with Sikaflex:

the seal was fixed with some tape during the curing time of the Sikaflex
Tomorrow I will visit the paint shop to check on any progress... I will keep you updated...

Freitag, 1. April 2011

one month to the deadline and only bad news...

This week I got 2 major drawbacks:
1. the wiring loom is so corroded that is is not usable any more, so I have to create a new one by myself
2. the paintshop isn't working on my body
My goal to drive to Hannover in my own fresh restored VW is not possible any more.
I have to step back and relax, take my time and continue until everything is o.k. - definitely this year, but definitely not this month!

Diese Woche habe ich 2 herbe Rückschläge erlebt:
1. der Kabelbaum ist so oxidiert, das ich ihn nicht mehr benutzen kann. Ich werde einen neuen anfertigen!
2. Die Lackiererei arbeitet nicht an meiner Karosserie.
Mein Ziel: Zum 1. Mai im eigenen  Auto nach Hannover zu fahren ist nicht mehr zu halten. Ich werde also 'dran bleiben und so lange weitermachen bis alles fertig ist, bestimmt noch dieses Jahr, bestimmt nicht mehr diesen Monat!